Tuesday, August 12, 2008

Another quick update

The major wiring surgery is done, and all that really remains to do on that is a bit of insulation, bundling, grafting on of extensions, and the addition of plugs. Pah - trivial! I have additionally retained the ciggie lighter connections - I plan to include a 12v socket coz it's useful for GPS and stuff (but not smoking anymore, nosiree)

I really hope that the parts of the loom required by the Westfield are what I have retained. I think so - the sections removed seemed logical, and the only relay that was redundant was for the pop-up headlights. I did have to fashion a bracket for a couple of the remaining relays which fits pretty well I think.
And then a pretty big moment - the fitting of the main body shell, which required a fair amount of modification using saw and Dremel. Was yet another worrying moment in the course of this build - butchering a pristine piece of fibreglass. I'm not convinced that I am at ease with working GRP to be honest.

Then it was a case of fixing in the roll bar - temporarily as it'll be off and on a bit yet.

And a trial re-fit of the wheel arches - they had been on the body to drill the holes in the correct place prior to the main shell going on. There wouldn't have been the clearance to get the drill in otherwise.

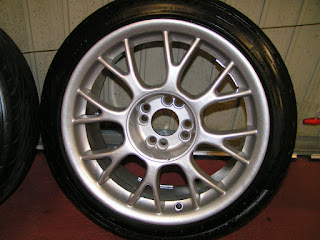
With the arch on I had to trial fit one of the refurbished wheels didn't I? I'm not sure that they aren't too wide or have too great an offset to be able to fit comfortably - it is going to come down to the amount of camber and stiffness of the suspension I suspect. The worst case scenario is that I may have to sell them and buy a smaller set which after all the effort getting them this far would be quite a blow.

And there was a disappointment with the brake caliper with the stuck bleed nipple - even after a couple of weeks of soaking in WD40 it would not come free. Using bolt extractors didn't work either, and so I think it is time to buy a replacement and recondition it (again). Ho hum.

Wednesday, July 23, 2008

Spaghetti!

Been working on the front wiring loom - a slightly daunting task that I've been putting off and off and off. It's a messy job removing the gooey grubby loom tape cleaning as I go. And I've elected to include the additional fun of scary surgery as I cut out endless lengths of what I hope is unnecessary wiring. There are many electrical features in the MX5 that aren't present in the Westfield (such as audio system and electric windows, plus provision for front fog lights, airbags, cruise control and so forth).

Not that it is actually required or even detailed in the build manual. But it vastly simplifies and lightens the loom (I've got a box load of amputated wire now and I'm only half way through the job!). Of course, this could go horribly wrong and leave me with a non-viable electrical system, or I could even have fun with electrical fires. But I've spent a long time snogging the wiring diagrams for the MX5 (which would be easier if I could have laid hands on the UK version not the US and Canadian that does have notable differences) and testing my assumptions with the multimeter at every step. So here's to hoping!

Other than that, the ECU is bolted on ready for the wiring.

Westfield returned the re-lengthened mid-steering column and it fits perfectly.

I fashioned a boot for the column where it passes through the bulkhead. Based on a Fiat 126/500 gearstick boot coz it was cheap and had a good flange to attach it to the bulkhead with. It's not too bad - still had to have a bit of a gap in the end in order to feed the column end through, but it looks tidier than a gaping hole and will hopefully help keep any grot from the engine bay in the engine bay.

Also did a better job on the air intake - very tricky as the airbox outlet is 70mm diameter, whilst the plenum intake is 65mm deformed into an oval. Eventually overcame this by cutting off the oval end of the original rubber MX5 pipe, grinding it down a little so that it fits inside the 70mm pipe and then using bad language and silicone lubricant to persuade it to fit.

The other pipework is on, along with the exhaust manifold and a shiny cover for it.

So is the radiator, fan, and the horns - Poop poop!

All the fuel lines are in place and connected up. I've left the fuel tank unsecured for now so that when it eventually is dropped to the deck there is easier access to the rear suspension bolts for final tightening.

Oh, and I added a gearstick boot using another Fiat part. It was a tight fit to get it so that the gearstick wasn't being forced out of gear when in 5th. I'm fairly happy with it - I think.

The latest setback though was when I went to fill the brake system and bleed them. Unfortunately one of the bleed nipples will not come out - I wish I had removed them when reconditioning the brakes, but I thought that leaving them in was going to help keep the canal clean. Bah. It's soaking in WD40 at the moment, and if all else fails I'll try drilling it out before resorting to replacing the whole brake caliper.

Thursday, July 3, 2008

The Engine is In!

...but not yet ready to turn over.

With a lot of help from Gavin, and from Spoddy and John (but no broomstick this time), we managed to get the engine into the car during a busy afternoon - with photographic evidence supplied by Sam. (Thank you very much everyone)

It actually went in easier than expected - certainly a lot easier than getting it out of the MX5 in the first place. It helped that the engine bay is a little more open (what with being a frame chassis) and that we rather sensibly dropped the nose of the car to help ease the transmission into the tunnel.

Unfortunately it wasn't to go in without a token fight - the support brackets didn't line up with the mounting holes pre-drilled by Westfield in the chassis, being out by around 10mm. We went over the brackets several times and were certain that everything was where it was supposed to be - so this may be down to variations in engine mounting points on the MX5, or alternatively just a bungle in the bracket design. After a bit of head scratching, I decided to slot the support bracket on the left hand side - just enough to allow the buffer to be bolted in. I reasoned that with the weight of the engine pressing down on it, the support on the other side, and the two anchor points on the transmission that this would be relatively safe to do. At least it allowed the engine to be finally secured - and what is the worse that can happen? The engine fly out I hear you cry - well, that would be something to see!

I felt that getting the engine in was a pretty big landmark point - and there certainly was some celebration afterwards.

Since then, the clutch has been connected and bled.

The propshaft has been installed.

Handbrake cables have been connected up (and secured in place with a couple of decent-sized e-clips due to me having not retained the securing clips from the MX5)

I've got the carbon cannister in position ready for plumbing in.

The fuel pump and fuel filter have been bolted to the chassis using rivnuts.

I've started to install the air intake system by bolting on the donor airbox and plenum.

And now I've come to a bit of a problem with the steering column. To install it entailed cutting a hole in the unblemished aluminium panelling - that made me wince! Unfortunately the sections turned out to be about 40mm too short.

I checked several times and I wasn't missing anything - it was just that the upper steering column that came from the MX5 had been over-shortened when I sent it to Westfield all those months ago. I've contacted them and sent it back to them for a partial un-shortening procedure, and there is certainly plenty to get on with in the meantime!

Sunday, June 15, 2008

Suspension Assembled

Following a few periods of "down tooling" whilst waiting on bolts and spacers to be sent through from Westfield, the front and rear suspension is all in place. Getting the diff into place was one of the toughest parts of that job as it weighs a fair bit, even when drained of oil. Still, it all went pretty easily and as the diff, the uprights and brakes are the first substantive pieces installed from the old donor MX5 it was quite satisfying too. I also got to spray a lot of stuff with Copaslip, which was messy and fun. Once everything was in place, connecting the brake hoses up should mean a (hopefully) closed brake system (woo!).


There are a couple of temporary bolts on the upper wishbone as I'm waiting some of the correct length (the instructions state 100mm, but they are too short and 120mm are required).

I haven't yet connected the steering rod ends to the front uprights - these like a couple of other bolts to set camber and tracking on the front and back I'm leaving loose for now.

With the wheel uprights in place, it is starting to look a little like a car (well with just a smidge of imagination) !

Next step - putting in the engine!

Wednesday, June 4, 2008

Stage 2 Well Underway!

During the recent hiatus in working on the car itself, I now have a dinky propshaft thanks to a company near Heathrow shortening and re-balancing the old one, and I've got a nicely re-conditioned and rebalanced set of alloys by a company down near Portsmouth.

I think they look neat, particularly when compared with their previous condition. They should look good on the car with the centre caps on, but I think the old tyres on them let them down - I wonder if the budget will stretch to a new set...

A couple of weeks ago I got the exciting call from Westfield that the completion pack was ready, so last Wednesday Gavin and I went up there in an white van causing havoc on the highways and collected it. As always the guys up at the factory were very chatty, and whilst we waited they popped the bushings into the suspension arms that I had been having a spot of bother with. There was a bit more to collect than I had reckoned with, and although it may have just fitted into a light van or estate I was thankful that we had gone equipped with a transit.

Following a terrible drive back through monsoon conditions and against the clock to get the van back in time, I now have more boxes in the garage and a study full of parts.

But I was all set to go!

That is I was up until the point where I started to discover missing or incorrect items such as metric rather than imperial bolts having been supplied for the suspension wishbones. Rather than bodge it, and with a sigh of resignation I sat down with the boxes and carried out an inventory down each washer needed for the next steps and compiled a list of missing items. I suspect this would have been a sensible thing to do at each collection, but when confronted with boxes of shiny goodies Xmas morning unwrapping frenzy sets in.

So I can't complete the front or rear suspension, but I have loosely attached what I can whilst missing some relevant parts (and I've added "tighten up suspension" to my worry list so that clown car style hilarity doesn't ensue when it is finally on the ground). I have finished the brake pipes and installed the main fuel pipes - more chassis drilling along the underside for the fixings for both of those. And the rear wiring loom is now loosely attached to the chassis (more drilling for the fixings for that too - the poor chassis is like a swiss cheese). Once the loom was in situ I popped in the handbrake, the first part from the donor car to be installed, and connected it up to the loom (and tested it for circuit connectivity when pulled just for fun and an excuse to play with the multimeter). Putting the handbrake in is way ahead of the point in the instruction manual, but other online build accounts recommended doing it now when tunnel access was still good.

Not quite as fun was the attempt to install the steering rack. The MX5 donor rack was substantially too wide in the main cylinder, so the steering pinion would have been outside the bodyshell - certainly not a good look. Following some checking, it dawned on me that the steering rack that came with the kit that I had ignored as I thought it was for the standard non-MX5 option had to be used, with a couple of adapters bolted to the tie rod ends and this would then allow the ball joints and wheel uprights from the Mazda to be used. If I had known I would have saved myself some trouble all those months ago reconditioning the MX5 rack, replacing the bent tie rod and indeed going all the way to Wales to get the damn thing in the first place.


Now I'm just waiting for the replacement bolts and whatnot to appear in the post. Until then I'll busy myself working on the front wiring loom ahead of it being needed. A sticky dirty job but one where the end result is quite satisfying.

Wednesday, April 30, 2008

End of Stage 1

Another pictureless update - sorry, but visually very little has changed since the last post.

Not strictly true; the brake pipes are all in twisting their way around the chassis like a twisty turny thing, and the rear wiring loom is complete. I'm actually quite pleased with the loom - once past the initial grubby job of unbinding the original and cleaning the adhesive off, modifying the wire bundle, re-binding it with spiwrap and crimping on a few new terminals was satisfying electrical work. I cannot say that I found the brake pipes as satisfying though - contorting them to avoid chassis contact without kinking or collapsing the pipes was fairly painstaking, plus brakes are one of the areas I like to have a good worry about.

So with those things completed I have gone ahead and ordered the completion pack for the kit. This is the pack with all the things that (should) make it roadworthy; seats, seatbelts, mirrors, shock absorbers, lights, etc. I've gone for the black interior with crimson inlays and piping, so I hope it'll contrast nicely with the BRG body, but not to the point of being eye-watering.

Until that pack is ready for collection (hopefully in a few weeks time), there are a few bits and pieces for me to tidy up:
  • The propshaft from the MX5 needs modifying by shortening and re-balancing it. Most companies that do this seem to be up the Northern end of England, but I'm looking for somewhere more local than that.
  • The alloy wheels need sorting. I've gone off doing them myself a bit - if funds allow, I'm sorely tempted to get them professionally done and rebalanced at the same time.
  • The suspension bushings need pressing in. I had a go at this - the metalastic bushings are supposed to be able to be pressed home using a bench vise. I claim otherwise - heaving on a sturdy vise, with cleaned suspension bore just ended up knackering the vise. Reading around, most people either get the bushings pre-installed (doh!) or go for the easier to fit but higher maintenance nylon bushings. I think it's time to look at getting, hiring, borrowing an arbor or hydraulic press that can exert some serious tonnage coz I've got about 16 to do.
As part of the ordering of the completion pack I had a couple of interesting discussions with Westfield.

Firstly I had found out from reading Westfield MX5 kit car forums that it doesn't have a heater and some talk had taken place about installing heated seats. I got in touch with Westfield about supplying them some heated seats and then me wiring them in, and they declined due to worries of me electrocuting my buttocks or somesuch. Shame - it'll be a fairweather car (or I'll have to wear plenty of clothing on chillier days).

Secondly I had forgotten to check about the catalytic converter that I had retrieved from the MX5; nowhere could I see instructions on where to install it. The simple answer was that you don't. Westfield can make an exhaust with integral cat if required (and at an additional cost). But apparently it's not necessary on pre-1995 MX5 engines in kit cars. Basically an engine from 1975 to 1995 (with specific exceptions) only needs an emissions test to get through the SVA, from this point on a cat test (and for the specific exceptions on earlier problem engines) and emissions test is required. I hope that my engine will be running clean enough to pass the emissions test following my rebuild of it (ulp) coz I have of course economised by getting the cat-free exhaust. I also need to remember to provide decent proof of the age and source of the engine for the SVA test.

Sunday, March 30, 2008

Skinning complete

570 rivets later and the aluminium panels are all attached to the chassis (well, apart from the transmission tunnel covers that need to stay off for now). There were about 4 rivets that due to access difficulties were not possible to get in completely flush, so I'll have to accept a 0.7% failure rate on that job. Shoddy I know.

Getting on for two of the tubes of sealant were required - I fully expect it to leak like a sieve in the great British weather, but I've done what I can to prevent it.


The drilling and de-burring of the rivet holes was frankly tedious, and the riveting was hard work - if I ever do this sort of thing again I am most assuredly investing in a compressor and air-powered rivet gun. Using the hide hammer to beat the panels into the contours of the chassis rails was fun though!

Following on from the skinning, the foot controls were next - quick to assemble and install. It looks cramped in there for my size 10s - it'll be interesting to see exactly how many times I can accelerate and brake at the same time.


Next task is to form and fit all the brake pipes (or possibly sort out the wiring loom that is still lurking under the workbench).