The Westfield Has Landed!
For the first time since it was an MX-5 over a year ago now, the car is resting on the ground. Without collapsing. Without the wheels pinging off in a comedy clown-car impression (although I suspect that will have much more impact when I'm wanging around a corner in it).
First was a bit of tyre-inflation using a 12v compressor (I knew that cigarette lighter socket I installed would be useful for something) to get the tyres to the correct and equal pressure, which amused me as the car was inflating its own tyres. Yes, time to up the medication, I know.
And then the car was carefully lowered onto the ground. I'm still not 100% sure about the size of the wheels - these are certainly as wide as they could possibly be without them protruding tackily. At least now I can get on and set up the ride-height and the wheel alignments.
That's not all that I have been doing though during the last month, despite real life interfering with the time I would otherwise have spent on the car. The rear brakes have been calibrated, the handbrake set, the exhaust is fitted, and I've spent a while modifying the MX5 steering column cowling to fit the Westfield dash.
Oh, and I've put on a bit more stripe.
Sunday, November 16, 2008
Monday, October 13, 2008
Tidying Up
Changing the oil filter and the oil pressure sensor did the trick - I suspect it was indeed the sensor which was the problem, but in any case I can now see the engine quickly getting up to the right pressure when it is running. Phew!
I removed a bit more wiring, reinstated another bit (I had removed a switch sensor from the clutch and the transmission which altered the idle speed when in neutral or changing gear - not vital but apparently the ECU throws a diagnostic error when it has been driven a while without either switch changing state) and now I think I'm happy with the loom. So I've tidied up the engine bay; finishing the spiwrap binding on the loom, fixing it and any loose pipes into place and I'm pretty happy with the result. In the end I did also replace the flasher relay and that fixed the intermittent (irregularly intermittent) left-hand indicators.
I've also added in the battery tray (lightly improvised as the battery is neither the original Mazda nor the battery that Westfield could supply) - I tried to mount it as close to the centre line as possible. Weight distribution is all over the place anyway with it mounted so high. Other minor jobs completed were the plumbing in of the windscreen washer, and the speedometer cable linkage. With just a little work I was able to use the bulkhead boot for the cable from the MX5, making it nice and tidy. I've read elsewhere that the speedo cable can be destined to failure as it is pretty much bent into place in the transmission tunnel at one end - we shall see.
Then it was onto the dashboard, and an utterly uneccessary change that I had decided to do was to replace the black dials with white for a more sporty look. This took about an hour of careful modification (including re-painting the white needles with a thin application of red model paint).
Getting the dashboard trial-fitted with the instrument pod installed took a little bit of time and patience - the fittings for it come through from behind, in what is now a very restricted and cramped space.
But I like the end result, and the dials illuminate pretty well too!
Remaining tasks are to get the carpet and seats in, pop on the exhaust (then I can tune the engine), fit various bits of trim, install the teenytiny boot, fit the half-tonneau, sort out the front mudguards, get some wheels on, and finally set-up the suspension and tracking.
Oh, and also to finish another utterly uneccessary job I've made for myself - the start of which can be seen by the eagle-eyed in the pictures above.
Monday, September 15, 2008
Engine Started!
The problem of the stalling engine turned out to be fairly obvious; there is an air outlet at the back of the intake manifold that feeds the assisted brakes on the MX5. There is no equivalent on the Westfield, so this outlet needed to be blocked off. I'd overlooked it in my eagerness to get the engine running.
With that blocked off, the engine fired up easily coz air was being fed into the injectors and cylinders rather than widdling out into the engine bay. Sounds very much more imposing than it ought to due to the lack of exhaust pipe and silencer at the moment.
And the coolant fan from the MX5 doesn't work - it really had experienced an overheating problem at some point in the past.
The causes of low oil pressure could be an oil leak (which doesn't appear to be the case - exhaust is too clean, no puddles under the car, and coolant is still clear), a faulty pressure sensor, or possibly the oil filter causing a bottleneck (I had put on an OEM rather than Mazda filter), otherwise it is either a blockage or oil pump problem within the engine. If it is a blockage or the oil pump is knackered, it's bad news - the engine will have to come out and be taken to pieces in a fairly major way. Ugh.
I'll start off replacing the oil filter and pressure sensor - this still requires a slight disassembly due to the restricted space in the Westfield engine bay. And I'll have to replace the fan motor of course.
And there is still the flaky left hand indicator - I'm beginning to suspect the relay rather than the wiring, but investigations continue apace.
With that blocked off, the engine fired up easily coz air was being fed into the injectors and cylinders rather than widdling out into the engine bay. Sounds very much more imposing than it ought to due to the lack of exhaust pipe and silencer at the moment.
It is still not a complete success, the oil pressure is reading worryingly low; around 10-15 pounds per square inch (around 1 bar). It ought to be approaching 40 psi, and I don't fancy running the engine at under that - if that is in fact an accurate reading.
The causes of low oil pressure could be an oil leak (which doesn't appear to be the case - exhaust is too clean, no puddles under the car, and coolant is still clear), a faulty pressure sensor, or possibly the oil filter causing a bottleneck (I had put on an OEM rather than Mazda filter), otherwise it is either a blockage or oil pump problem within the engine. If it is a blockage or the oil pump is knackered, it's bad news - the engine will have to come out and be taken to pieces in a fairly major way. Ugh.
I'll start off replacing the oil filter and pressure sensor - this still requires a slight disassembly due to the restricted space in the Westfield engine bay. And I'll have to replace the fan motor of course.
And there is still the flaky left hand indicator - I'm beginning to suspect the relay rather than the wiring, but investigations continue apace.
Sunday, September 7, 2008
Wibbly Progress
Slow and wibbly progress...
The scuttle has been completed, with the windscreen, wiper boxes and motor, and the wing mirrors all installed. It was one of the more labour-intensive body panels, so I'm glad it is out of the way. Getting the rake of the windscreen and distance from the rear datum correct took a bit of patient fiddling.
Then that was followed by a bit more wiring fun (there is *always* wiring fun!)
Popping the scuttle on, and the dashboard temporarily in place followed, along with the headlights, rear lights, and side indicators. The side indicators were a bit of a pain - exacting and complex holes were required to be cut for them.
The header tank was the next thing, completing the cooling system. I think I've mounted it a little low but it is still above the entire system so it ought to be OK.
And then it was time for a trial start-up! With an audience of course.
Who were inevitably disappointed.
Nothing happened at all - the secondary circuits for lights and instrumentation worked (after a fashion - one of the indicators was under the mistaken impression that it was a headlamp). But the primary circuits for the ECU, fuel pump, and ignition coil are as dead as a very dead thing indeed. The wiring diagrams had to come out yet again - but it became clear pretty rapidly that an instant fix wasn't going to happen.
Some amusement was provided by me accidentally triggering the horns that without a bonnet on and in the enclosed garage caused us all to jump in the air in shock.
Since then I've removed the scuttle and set about the wiring with the manuals, multimeter, and home-made diagnostic tool.
So far I've discovered a duff ground that I had done which I corrected, a duff ground that was due to corrosion on one of the MX5 common earth connectors which I replaced. Sorting these has corrected the side-indicator problem, the ECU is communicating correctly and not reporting any errors, and the engine turns over. It doesn't yet idle and always stalls however.
I think (hope) that this is just down to timing settings, but it is possible that a problem still exists in the wiring somewhere. For example, I found out that one of the wires that I removed is required (the neutral/clutch switch wire) - I don't think that it should prevent the engine starting though. To rule that out in any case, I've fashioned a temporary replacement.
It's easy to think that if I were to do it again that I wouldn't cut out the wires from the loom that are not required. But it would have just annoyed me knowing that they were in there.
The scuttle has been completed, with the windscreen, wiper boxes and motor, and the wing mirrors all installed. It was one of the more labour-intensive body panels, so I'm glad it is out of the way. Getting the rake of the windscreen and distance from the rear datum correct took a bit of patient fiddling.
Then that was followed by a bit more wiring fun (there is *always* wiring fun!)
Popping the scuttle on, and the dashboard temporarily in place followed, along with the headlights, rear lights, and side indicators. The side indicators were a bit of a pain - exacting and complex holes were required to be cut for them.
The header tank was the next thing, completing the cooling system. I think I've mounted it a little low but it is still above the entire system so it ought to be OK.
And then it was time for a trial start-up! With an audience of course.
Who were inevitably disappointed.
Nothing happened at all - the secondary circuits for lights and instrumentation worked (after a fashion - one of the indicators was under the mistaken impression that it was a headlamp). But the primary circuits for the ECU, fuel pump, and ignition coil are as dead as a very dead thing indeed. The wiring diagrams had to come out yet again - but it became clear pretty rapidly that an instant fix wasn't going to happen.
Some amusement was provided by me accidentally triggering the horns that without a bonnet on and in the enclosed garage caused us all to jump in the air in shock.
Since then I've removed the scuttle and set about the wiring with the manuals, multimeter, and home-made diagnostic tool.
So far I've discovered a duff ground that I had done which I corrected, a duff ground that was due to corrosion on one of the MX5 common earth connectors which I replaced. Sorting these has corrected the side-indicator problem, the ECU is communicating correctly and not reporting any errors, and the engine turns over. It doesn't yet idle and always stalls however.
I think (hope) that this is just down to timing settings, but it is possible that a problem still exists in the wiring somewhere. For example, I found out that one of the wires that I removed is required (the neutral/clutch switch wire) - I don't think that it should prevent the engine starting though. To rule that out in any case, I've fashioned a temporary replacement.
It's easy to think that if I were to do it again that I wouldn't cut out the wires from the loom that are not required. But it would have just annoyed me knowing that they were in there.
Tuesday, August 12, 2008
Another quick update
The major wiring surgery is done, and all that really remains to do on that is a bit of insulation, bundling, grafting on of extensions, and the addition of plugs. Pah - trivial! I have additionally retained the ciggie lighter connections - I plan to include a 12v socket coz it's useful for GPS and stuff (but not smoking anymore, nosiree)
I really hope that the parts of the loom required by the Westfield are what I have retained. I think so - the sections removed seemed logical, and the only relay that was redundant was for the pop-up headlights. I did have to fashion a bracket for a couple of the remaining relays which fits pretty well I think.
And then a pretty big moment - the fitting of the main body shell, which required a fair amount of modification using saw and Dremel. Was yet another worrying moment in the course of this build - butchering a pristine piece of fibreglass. I'm not convinced that I am at ease with working GRP to be honest.
Then it was a case of fixing in the roll bar - temporarily as it'll be off and on a bit yet.
And a trial re-fit of the wheel arches - they had been on the body to drill the holes in the correct place prior to the main shell going on. There wouldn't have been the clearance to get the drill in otherwise.
With the arch on I had to trial fit one of the refurbished wheels didn't I? I'm not sure that they aren't too wide or have too great an offset to be able to fit comfortably - it is going to come down to the amount of camber and stiffness of the suspension I suspect. The worst case scenario is that I may have to sell them and buy a smaller set which after all the effort getting them this far would be quite a blow.
And there was a disappointment with the brake caliper with the stuck bleed nipple - even after a couple of weeks of soaking in WD40 it would not come free. Using bolt extractors didn't work either, and so I think it is time to buy a replacement and recondition it (again). Ho hum.
Wednesday, July 23, 2008
Spaghetti!
Been working on the front wiring loom - a slightly daunting task that I've been putting off and off and off. It's a messy job removing the gooey grubby loom tape cleaning as I go. And I've elected to include the additional fun of scary surgery as I cut out endless lengths of what I hope is unnecessary wiring. There are many electrical features in the MX5 that aren't present in the Westfield (such as audio system and electric windows, plus provision for front fog lights, airbags, cruise control and so forth).
Not that it is actually required or even detailed in the build manual. But it vastly simplifies and lightens the loom (I've got a box load of amputated wire now and I'm only half way through the job!). Of course, this could go horribly wrong and leave me with a non-viable electrical system, or I could even have fun with electrical fires. But I've spent a long time snogging the wiring diagrams for the MX5 (which would be easier if I could have laid hands on the UK version not the US and Canadian that does have notable differences) and testing my assumptions with the multimeter at every step. So here's to hoping!
Other than that, the ECU is bolted on ready for the wiring.
Westfield returned the re-lengthened mid-steering column and it fits perfectly.
I fashioned a boot for the column where it passes through the bulkhead. Based on a Fiat 126/500 gearstick boot coz it was cheap and had a good flange to attach it to the bulkhead with. It's not too bad - still had to have a bit of a gap in the end in order to feed the column end through, but it looks tidier than a gaping hole and will hopefully help keep any grot from the engine bay in the engine bay.
Also did a better job on the air intake - very tricky as the airbox outlet is 70mm diameter, whilst the plenum intake is 65mm deformed into an oval. Eventually overcame this by cutting off the oval end of the original rubber MX5 pipe, grinding it down a little so that it fits inside the 70mm pipe and then using bad language and silicone lubricant to persuade it to fit.
The other pipework is on, along with the exhaust manifold and a shiny cover for it.
So is the radiator, fan, and the horns - Poop poop!
All the fuel lines are in place and connected up. I've left the fuel tank unsecured for now so that when it eventually is dropped to the deck there is easier access to the rear suspension bolts for final tightening.
Oh, and I added a gearstick boot using another Fiat part. It was a tight fit to get it so that the gearstick wasn't being forced out of gear when in 5th. I'm fairly happy with it - I think.
The latest setback though was when I went to fill the brake system and bleed them. Unfortunately one of the bleed nipples will not come out - I wish I had removed them when reconditioning the brakes, but I thought that leaving them in was going to help keep the canal clean. Bah. It's soaking in WD40 at the moment, and if all else fails I'll try drilling it out before resorting to replacing the whole brake caliper.
Thursday, July 3, 2008
The Engine is In!
...but not yet ready to turn over.
With a lot of help from Gavin, and from Spoddy and John (but no broomstick this time), we managed to get the engine into the car during a busy afternoon - with photographic evidence supplied by Sam. (Thank you very much everyone)
It actually went in easier than expected - certainly a lot easier than getting it out of the MX5 in the first place. It helped that the engine bay is a little more open (what with being a frame chassis) and that we rather sensibly dropped the nose of the car to help ease the transmission into the tunnel.
Unfortunately it wasn't to go in without a token fight - the support brackets didn't line up with the mounting holes pre-drilled by Westfield in the chassis, being out by around 10mm. We went over the brackets several times and were certain that everything was where it was supposed to be - so this may be down to variations in engine mounting points on the MX5, or alternatively just a bungle in the bracket design. After a bit of head scratching, I decided to slot the support bracket on the left hand side - just enough to allow the buffer to be bolted in. I reasoned that with the weight of the engine pressing down on it, the support on the other side, and the two anchor points on the transmission that this would be relatively safe to do. At least it allowed the engine to be finally secured - and what is the worse that can happen? The engine fly out I hear you cry - well, that would be something to see!
I felt that getting the engine in was a pretty big landmark point - and there certainly was some celebration afterwards.
Since then, the clutch has been connected and bled.
The propshaft has been installed.
Handbrake cables have been connected up (and secured in place with a couple of decent-sized e-clips due to me having not retained the securing clips from the MX5)
I've got the carbon cannister in position ready for plumbing in.
The fuel pump and fuel filter have been bolted to the chassis using rivnuts.
I've started to install the air intake system by bolting on the donor airbox and plenum.
And now I've come to a bit of a problem with the steering column. To install it entailed cutting a hole in the unblemished aluminium panelling - that made me wince! Unfortunately the sections turned out to be about 40mm too short.
I checked several times and I wasn't missing anything - it was just that the upper steering column that came from the MX5 had been over-shortened when I sent it to Westfield all those months ago. I've contacted them and sent it back to them for a partial un-shortening procedure, and there is certainly plenty to get on with in the meantime!
Sunday, June 15, 2008
Suspension Assembled
Following a few periods of "down tooling" whilst waiting on bolts and spacers to be sent through from Westfield, the front and rear suspension is all in place. Getting the diff into place was one of the toughest parts of that job as it weighs a fair bit, even when drained of oil. Still, it all went pretty easily and as the diff, the uprights and brakes are the first substantive pieces installed from the old donor MX5 it was quite satisfying too. I also got to spray a lot of stuff with Copaslip, which was messy and fun. Once everything was in place, connecting the brake hoses up should mean a (hopefully) closed brake system (woo!).
There are a couple of temporary bolts on the upper wishbone as I'm waiting some of the correct length (the instructions state 100mm, but they are too short and 120mm are required).
I haven't yet connected the steering rod ends to the front uprights - these like a couple of other bolts to set camber and tracking on the front and back I'm leaving loose for now.
With the wheel uprights in place, it is starting to look a little like a car (well with just a smidge of imagination) !
Next step - putting in the engine!
Wednesday, June 4, 2008
Stage 2 Well Underway!
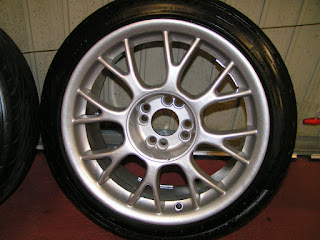
During the recent hiatus in working on the car itself, I now have a dinky propshaft thanks to a company near Heathrow shortening and re-balancing the old one, and I've got a nicely re-conditioned and rebalanced set of alloys by a company down near Portsmouth.
I think they look neat, particularly when compared with their previous condition. They should look good on the car with the centre caps on, but I think the old tyres on them let them down - I wonder if the budget will stretch to a new set...
A couple of weeks ago I got the exciting call from Westfield that the completion pack was ready, so last Wednesday Gavin and I went up there in an white van causing havoc on the highways and collected it. As always the guys up at the factory were very chatty, and whilst we waited they popped the bushings into the suspension arms that I had been having a spot of bother with. There was a bit more to collect than I had reckoned with, and although it may have just fitted into a light van or estate I was thankful that we had gone equipped with a transit.
Following a terrible drive back through monsoon conditions and against the clock to get the van back in time, I now have more boxes in the garage and a study full of parts.
But I was all set to go!
That is I was up until the point where I started to discover missing or incorrect items such as metric rather than imperial bolts having been supplied for the suspension wishbones. Rather than bodge it, and with a sigh of resignation I sat down with the boxes and carried out an inventory down each washer needed for the next steps and compiled a list of missing items. I suspect this would have been a sensible thing to do at each collection, but when confronted with boxes of shiny goodies Xmas morning unwrapping frenzy sets in.
So I can't complete the front or rear suspension, but I have loosely attached what I can whilst missing some relevant parts (and I've added "tighten up suspension" to my worry list so that clown car style hilarity doesn't ensue when it is finally on the ground). I have finished the brake pipes and installed the main fuel pipes - more chassis drilling along the underside for the fixings for both of those. And the rear wiring loom is now loosely attached to the chassis (more drilling for the fixings for that too - the poor chassis is like a swiss cheese). Once the loom was in situ I popped in the handbrake, the first part from the donor car to be installed, and connected it up to the loom (and tested it for circuit connectivity when pulled just for fun and an excuse to play with the multimeter). Putting the handbrake in is way ahead of the point in the instruction manual, but other online build accounts recommended doing it now when tunnel access was still good.
Not quite as fun was the attempt to install the steering rack. The MX5 donor rack was substantially too wide in the main cylinder, so the steering pinion would have been outside the bodyshell - certainly not a good look. Following some checking, it dawned on me that the steering rack that came with the kit that I had ignored as I thought it was for the standard non-MX5 option had to be used, with a couple of adapters bolted to the tie rod ends and this would then allow the ball joints and wheel uprights from the Mazda to be used. If I had known I would have saved myself some trouble all those months ago reconditioning the MX5 rack, replacing the bent tie rod and indeed going all the way to Wales to get the damn thing in the first place.
Now I'm just waiting for the replacement bolts and whatnot to appear in the post. Until then I'll busy myself working on the front wiring loom ahead of it being needed. A sticky dirty job but one where the end result is quite satisfying.
Subscribe to:
Posts (Atom)